RTX 3090 in a CONSOLE Size PC – It Works and its AMAZING!

Share:
Table of contents
Today we are pushing the limits of what is possible with an ITX system by building an extremely powerful PC into a super compact 7 liter case. Honestly, I have never been this excited about a build before, and I’m sure you are all going to love it. Why you may ask? Well that is because we’re jamming in a 16-core processor and an RTX 3090 into a case that is the same size as a GPU box.


I’m sure by now everybody knows what NVIDIA’s new RTX 3000 series GPUs can bring to the table. The performance improvement over the previous generation is just incredible, but to get that kind of performance in an enclosure that is about the same size as one of the upcoming next-gen consoles is definitely going to be interesting. I’m really excited about this build, and I hope you all are as well, so let me walk you through the rest of the components.
The Case


Let’s talk a little bit about the case because it’s the main star of the show. You see as we were doing our inventory before moving into the new office, we came across this beautiful navy gray Dr. Zaber Sentry 2.0 ITX case. It’s super compact, it comes in just under 7 liters, and I just love the way it looks. It’s built really well, it’s compact, it’s super stealthy, and it just fits in within any environment. Taking a look at the case itself, the first thing that stood out to me was the build quality. This thing is built out of steel and then powder coated in gray. You will instantly notice the quality of the craftsmanship when you lay your hand on it.


The side panels are perforated for both the CPU and GPU. One thing that you won’t see in this case is a dust filter, so we are getting pure unrestricted airflow… which also means more dust as well. It also has some really intelligent inward and outward airflow because of that. Basically, the GPU and the CPU are in their own zones and both get direct access to fresh air through the perforations. Also, since the GPU is mounted at the top a lot of the hot air will be exhausted out the top vents too. Like with all cases, you need to live with some limitations. There is no triple slot GPU support, and if you choose a full length GPU you will need to use an air cooler for the CPU. And that air cooler is limited in height to just 47 millimeters.


You can orient the case both horizontally or vertically. I chose to go with the vertical orientation because it looks better with the vertical stand attached. Now just keep in mind that just like other boutique ITX cases Dr. Zaber only does a limited production run every now and then based on how much interest they get. Recently they posted a tweet mentioning that this might be the last batch for the year.
CPU & Heatsink


Now moving into the CPU, we chose the Ryzen 9 3950X, which features 16 cores and 32 threads. This is the fastest CPU that AMD has come out with for the AM4 for platform. Now I know that many of you are thinking this processor has a TDP of 105W, so you will need to find adequate cooling solution to cool this hot processor. Well… remember the air cooler restrictions that I talked about earlier with with the Sentry 2.0 case? We had to be a little bit creative with that.


And so we decided to go with Noctua’a NH-L9a Chromax. First of all, this looks incredible well with the matte black heatsink and the fan, but most importantly it’s height is exactly 37mm with the fan installed so we are right within the limits. Secondly, we are going to be running that 3950X in Eco Mode which essentially limits its TDP to 65W, which in theory will reduce its top-end performance, but you are still getting 32 threads. We will talk about that a little bit later in the article.
Motherboard


Housing the CPU and the cooler is the ASUS ROG STRIX B550I Gaming. This motherboard is just jam packed with absolutely everything ASUS could possibly fit into a small form factor. It has an 8+2 phase PWM design that is actively cooled by a fan, and it’s also the only motherboard in its entire lineup that supports memory speeds up to DDR4-5100. The primary M.2 slot is mounted above the chipset and covered with a heatsink. As for connectivity, you name it and this board has it. There is WiFi 6, an Intel 2.5G LAN port, and plenty of USB 3.2 Gen2 connectors.


The motherboard’s back is where you will find the secondary M.2 slot, which is a rarity on Mini-ITX motherboards. And for those of you wondering we will be populating both M.2 slots with NVMe SSDs. The primary slot is going to feature Corsair’s MP600 2TB drive, this is a PCIe Gen4 drive and given their insane bandwidth capabilities it does tend to run hot so the motherboard’s built-in heatsink should help dissipate that heat. The rear slot will feature a Crucial P5 2TB Gen3. For memory crucial hooked us up with an amazing Ballistix Max 32GB kit with a memory speed of DDR4-4000, which we are running at DDR4-3733 CL17. I love the matte black industrial design on the heatspreaders and it’s low profile so we shouldn’t run into any compatibility issues with the case.
GPU Choices


Moving on to the GPU and this one was a really tough call to make. You see initially we wanted to go with the RTX 3080 Founder’s Edition graphics card. It was a dual slot GPU and the dimensions were right within the case specs, and I’ll be honest it’s the best looking graphics card that I’ve ever seen. The problem is the fan orientation, NVIDIA designed the RTX 3080 FE in such a way that it directly exhausts hot air at the back, and in this case it would be exhausting hot air into a blank panel. Our concern was that the hot air might get deflected into the bottom compartment that holds the motherboard and the PSU area, and that could increase overall interior temperatures.


As a result we had to look elsewhere and fortunately we were able to get EVGA to send us their RTX 3090 XC3 dual-slot card. The cooling design on this GPU is pretty standard with the downdraft layout on top of a massive heatsink. I’m not really a fan of how it looks, especially the red accents that just stick out like a sore thumb. Actually, it does remind me of something…


Powering the entire build is Silverstone’s SX700 700W 80Plus Platinum rated power supply. It is compact, has plenty of power for the RTX 3090 and the Ryzen 3950X.
The Assembly


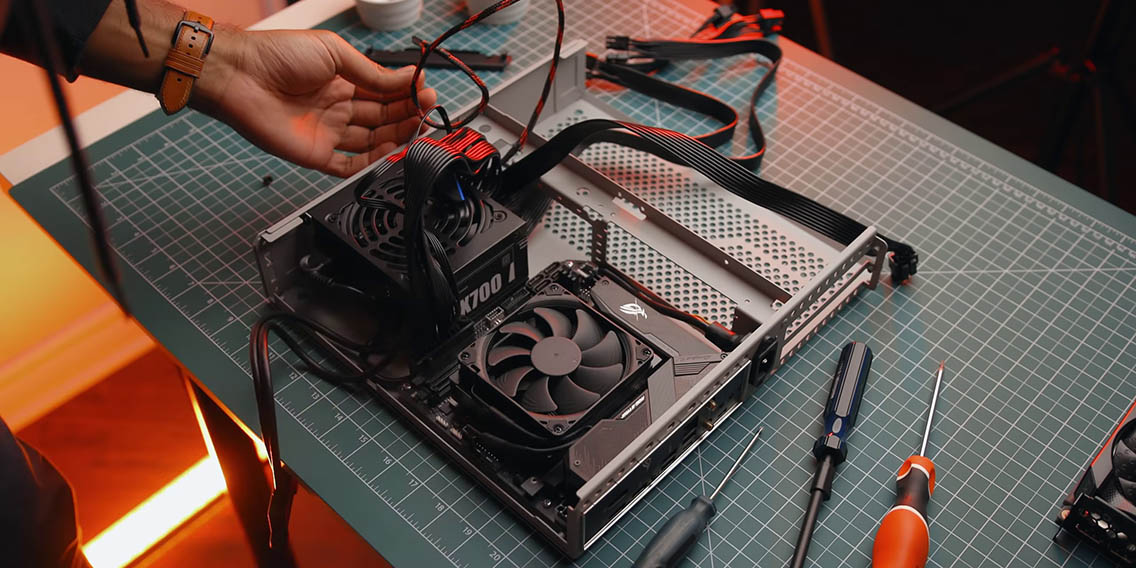


Now that you are aware of what’s going inside this beautiful navy gray Sentry 2.0 one, let’s put this thing together and hope we don’t run into any issues.


So the build is complete – and it works! – and we have Mike joining us. Mike had to deal with a lot of the optimizations and issues because this system was at his place. He worked on it for a couple of days too, and he’s pretty tired from all the work it took. He wasn’t originally convinced that this was gonna work as well as it did, but he was hell bent on getting it optimized to the best of his abilities, but that doesn’t mean that there weren’t some issues.
A Few Issues


The first issue that I want to talk about are the non-sleeved cables with the power supply. I had to actually uninstall a lot of the components to route the cables, like the memory for instance and yeah it was just so frustrating. Honestly, I just gave up at a point and asked Mike to do it because I really don’t like cable routing. The problem with those flat cables is that in order to get them through the case – they are vertically flat by the way – and the last thing you want in such a slim chassis is something that is vertically high. Trying to manipulate them and move them around is a lot harder than just regular sleeved cables.


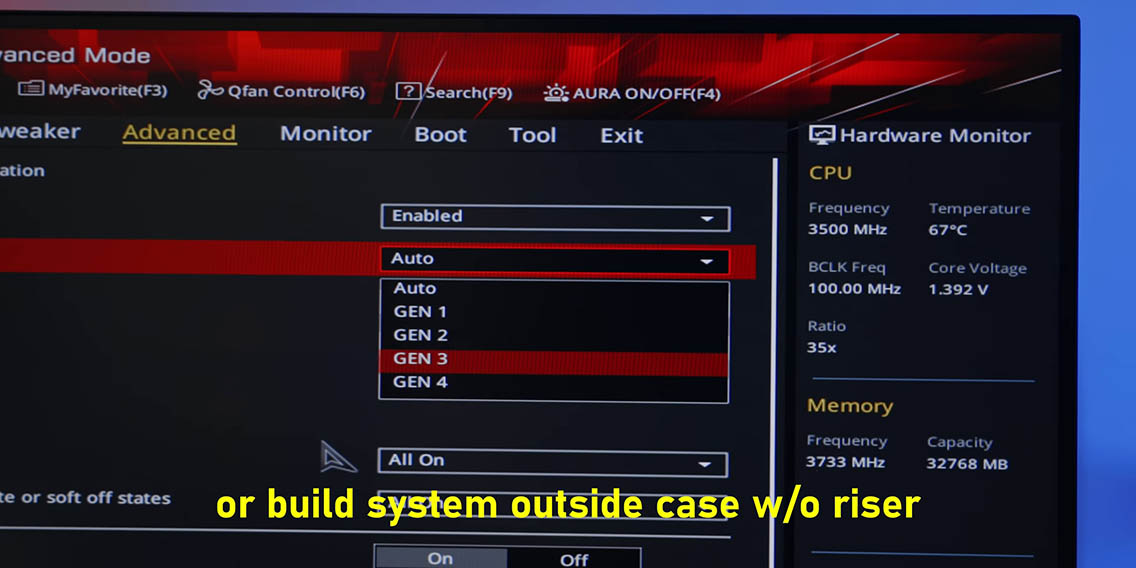
Another issue that we ran into the second we started the system is that the GPU wasn’t detected, and that brought us back to the RX 5700 days when you plugged a PCIe Gen4 card into a PCIe Gen3 riser cable – in this case it’s a sort of a riser PCB – and it just wasn’t detected by the motherboard. One of the obvious signs of an issue was that the BIOS was loading like a dot matrix printer, we actually posted that on Twitter because we were laughing our asses off. The solution is that you first need to install an older GPU, switch the motherboard over to Gen3 signaling, re-install the RTX 3000 series card, and then it will boot without a problem.


The other thing we wanted to quickly talk about is Eco Mode and how we addressed that. There is an issue with the ASUS ROG motherboards where the motherboard itself takes over Eco Mode. In most situations what should happen is that you should be able to enable Eco Mode in Ryzen Master, turn on Precision Boost Overdrive in the BIOS, and then basically Ryzen Master will take over that Eco Mode and there’s no problem. It seems like ASUS BIOS is taking precedence over Ryzen Master. Luckily our ROG motherboard has a 65W power mode that you can enable and you are off to the races, you don’t even have to worry about Ryzen Master anymore.
Temps & Benchmarks


Now let’s focus on temperatures and also clock speeds over time. Under a full core load the 3950X stayed under 80°C, and when gaming both the CPU and the GPU were around 85°C max. Performance in gaming versus the 3950X in an open test bench running at its default 105W TDP was literally the same since the GPU is the bottleneck most of the time. The lightly threaded workloads also have very similar results to the stock 3950X.
Future Optimizations & Mods


I want to go into a little bit more about what’s happening here with the temperatures in this case. The GPU is on the top and it has direct access to cool air from the outside through a grill on the left side. While a lot of that heat is also being exhausted out of the top of the case, not all of it does. What Dr. Zaber did is they gave this whole case a compartmentalized approach and what ends up happening is that some excess heat does get built up in this top compartment because the GPU exhausts its air all the way around. What I really want to try is a modification, maybe in another article, where we try and force some air out of the top area in order to speed up the cooling of the GPU.


Underneath in the CPU area there is still some heat soak happening from that hot GPU, but what also happens there is that with the CPU getting fresh air from outside any of the heat is exhausted directly down into the motherboard area. However, because of the additional perforations on the side a lot of that is also exhausted through there. I think that we can do a couple more little voltage modifications in order to get the most out of that processor. Right now it’s on a full core load, it’s performing really, really well and in gaming is performing phenomenally, but I would like to see the temperatures just a little bit lower. Truthfully, I think what that also means is that even though this build started off as “we’re just going to put some crazy shit together and see if it actually works” it has morphed into Mike really wanting this as his main PC and just wanting to tinker around with it.
Conclusion


I hope you enjoyed this build. I’m super jealous that Mike is going to be keeping this system because this case is amazing. But I also want to hear from you, do you have any suggestions about potential upgrades or potential mods that we might be able to do inside a 7 liter case? Let us know!
Buy items in this review from Amazon & our other partners at the links below:
EVGA RTX 3090 XC3 Ultra – https://bit.ly/3jfLYaW
Ryzen 9 3950X – https://geni.us/3950X
ROG STRIX B550-I – https://geni.us/STRIXB550ITX
Crucial Ballistix MAX – https://geni.us/BALLMAX
Crucial P5 SSD – https://geni.us/P52TB
Corsair MP500 SSD – https://geni.us/MP600
Silverstone SX700 – https://geni.us/SX700PT
Sentry 2.0 – https://bit.ly/30rAeee