Tips for the PERFECT Cable Management PC Build

Share:
Table of contents
Today we are talking about my 4 easy cable managements tips, so you can have your system nice and cool. Having good cable management won’t only will make your system look better, but you also have a cooler system because there is no airflow interference in the interior. And it also allows for easier upgrades down the line, for example if you have to replace a drive or if you have to swap out some cables, having things organized will make your life easier down the road.


Now I’m no Master, but I have done my fair share of systems so I applied the same techniques over and over and they seem to work well for me. I don’t do pristine work where each cable individually has its own channel, but this is primarily to make sure that the interior is looking fine and the back panel can close without any force.
Routing Around The Motherboard


Our first tip for cable management is using your motherboard to conceal cables. This is something that I’ve been doing for a while, but now as motherboards get little bit more complex in terms of their design it actually helps with cable management. You can normally do this with fan cables, you can wrap them around RAM slots, cooler mounting, the MOSFET heatsinks, and you can use the case cavities to hold excess fan cables. You can also route smaller cables below the larger ones to hide them and also to hold them. Some motherboard components like headers can also be good to route cables around them to create a nice controlled path. This is super beneficial for all-in-one coolers that have a thousand cable coming out from the pump.
Case Cables


Tip #2 is to route all your standard case cables first as this simplifies your cable work afterwards. You basically want to separate the USB versus the front I/O cables and work on them individually. The I/O cables are first because they are individual little tiny cables and it really helps when they are contained first. The USB 3.0 header cable is a super thick cable that I hate, and for it to stay flat at the bottom you need to extend it a little bit so that the cable can actually create that a nice seamless bend. The audio cable can be channeled right across the bottom of the motherboard so it doesn’t interfere with anything else and it can be slightly tucked away underneath the motherboard too. This way everything is cleaned up and ready to go before the big cables come in.
Focus On The Back


One little trick I do to compress all these front I/O cables – which are individual and very annoying – is to just compress them with a slightly thicker cable. I normally do it with the 24-pin PSU cable, it saves time and in the end it looks just fine. A slightly less lazy way is to simply tuck them underneath a slightly thicker cable already before you populate all the other power supply cables. This way the thicker cables are on top, so the little ones are kind of controlled and everything is already flat before you populate other cables on top of it. I have done exactly that with my fan cables for the AIO, there are three fan cables coming underneath this bracket and I think that is a really good way to just hide them. The little thicker cables for the 4-pins fan cables are underneath all the other thick stuff and being secured with the velcro strips, but normally you just have a standard cable tie holding this entire cable mess.
Power Supply Cables


Point #3 are power supplies and don’t be afraid if you have a non-modular power supply because those are just as easy to route in terms of cables as modular units. Now for modular units it’s self-explanatory, you leave only the needed cables and this way you minimize the entire cable clutter, but for non-modular units bunch up the cables you know that you will not be using so there is less clutter when the cables actually exit. This way you have a concentration of unused cables to be contained with the power supply.


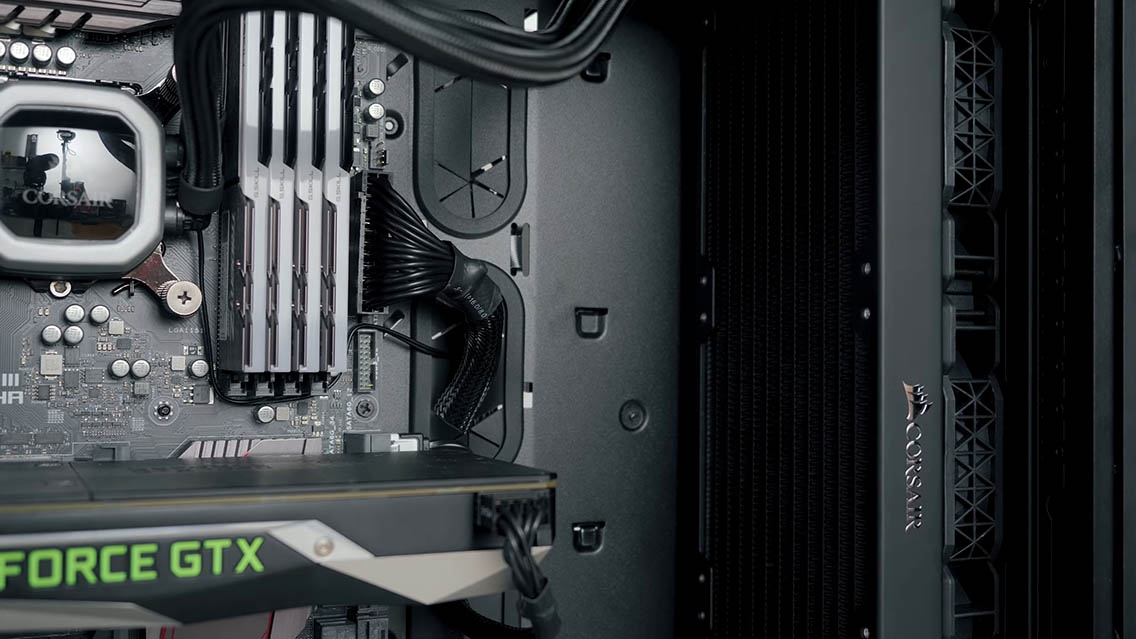
Once the power supply is inserted it can look intimidating with so many cables to work on, but work on them one by one. First I route the 8-pin and I run it on the side of the case and exit through the cutout at the top. Sometimes I leave the cable hugging the side case once it’s going up, but in this case I decided to route it through the center just to see if I can break up the cable clutter and actually make it look better. The 24-pin cable is next, it is the biggest cable so you exit it through the grommet that is closest to the 24-pin connector. You plug that in and then pull back any unused length so the interior is cleaner, which is the priority.


On the majority of cases you have this bottom lip beside the power supply which usually gives you like at least one or two fingers of clearance, so you can stuff anything unused in that cavity. For the GPU cable I don’t mind that we have no opening in the bottom, sometimes you can route it from the power supply shroud, but it means that the cable is kind of sticking out from the GPU pointing down. Sometimes it looks good but I actually prefer the side exit, and then you just have to make sure to tighten it at the back s the cable doesn’t droop. As mentioned above the priority is the cleanliness on the interior and you can stash away and hide things behind the case.
Securing The Cables


And now to tie the whole thing together we need to secure those cables. The majority of cases arrive with at least a few zip ties and these are awesome for larger cables, but you can also use standard metal strings to hold the smaller cables even if they don’t look as good as a zip tie. If your case has velcro straps that is even better because they are reusable. I secure cables based on how they are routed, and if I have any zip tie points around. My 24-pin cable is kind of this anchor behind the motherboard, and I secure and route many other cables underneath it so they are held in place by the hefty 24-pin cable. I route the SATA power underneath it, and because it’s flat I just have to find the flat area around the case so it’s not going to be on an angle that will prevent the side panel from closing. Also the SATA data cable is very thin, so it can easily be routed underneath any of the other cables.


Now when using zip ties sometimes you want to leave a little bit loose in case you want to maybe pass something else through it before actually fully securing it to the chassis. My entire approach is having this big supporting 24-pin cable that holds everything in place, because I secure 24-pin cable at the bottom, and at least at one point at the top before it exits onto the interior. Of course you can take some more time and route each cable individually to see if you can place them beside each other and how the fit within the space you have in the enclosure. The majority of cases follow the structure that I’ve been using on this Corsair Obsidian 500D, so it will apply to basically any other modern case too.
Shrouds & Grommets & Tubes


One of the reasons why power supply shrouds are so popular is because they do half the job for you. They cover up the entire cable exit from the power supply, and all you have to worry about is the re-entry of cables into the interior. What happens if your power supply shroud is bit more exposed or you don’t have one at all? Well check this out, I have used the velcro strap that arrived with the power supply and I collected all the cables so that whole exit doesn’t look as cluttered. Then I can do my standard cable work around the back, but the most important thing because it’s visible is to make sure that that the cable exiting the PSU are under control too.


Also, don’t forget about the rubber grommets, because you can see they are a multi-layered part allowing you to pass certain cables. However, if the little rubber pieces are flipped up or down too much they can reveal a little bit too much of what is behind them, so just make sure that all the rubber flaps are flat with the cable. Also most of the time, the power supply has a little gap above it, which is perfect for routing USB cables from an all-in-one cooler or if you have an audio cable that you want to pass you can use that little area to route it.


Certain cases have so many additional I/O cables, like this case has an included fan controller that needs power and a connection to the motherboard, and all of these additional wires can be really frustrating to initially handle, especially if you have inserted the power supply beforehand. One thing to do is you can go step-by-step by isolating each cable and making sure that you are routing just the I/O cables first, then your fan controller, then your audio, etc. And if you really get frustrated some sleeving to put it all the cables together can definitely simplify the process and create a tube of cables that looks a lot more appealing. While cases are getting bigger and we have more area to work with, more case manufacturers need to do what NZXT is doing in terms of creating these dedicated plastic channel guides so you can seamlessly route your cables around the edges and nothing is in the center. I think that is a brilliant design.
Conclusion


And so that’s my approach to cable management. I know it’s kind of simplified because I don’t spend too much time on it, but I find that having that anchor 24-pin cable holding all the cables underneath it means that if I have to swap out any hardware the replacement process is greatly simplified. I am no cable management guru though, so let me know how you do your cable management or even if you maybe don’t even bother with it.