IT’S DONE! The EPIC Workstation Build Is Alive!

Share:
Dmitry: Hello good people, Dmitry here with Hardware Canucks. I finally built my dream water-cooled hardline system and I can totally see how this becomes an expensive hobby. Now in the previous article we went over all the components and all the initial hardware installation, and then for the first time ever I disassembled a graphics card.


Dmitry: So many of you have asked why I didn’t just wait for third generation ThreadRipper – I went with the 2950X instead – and the reason why is because those upcoming processors will actually be using a new sTR4X socket and it will require a new generation of motherboards based on the TRX40 platform, which means absolutely no compatibility with first or second generation ThreadRipper CPUs or motherboards. I didn’t want to wait any longer and I just wanted to build a system, because otherwise you will constantly be waiting. So let’s pick up where we left off.
Hans – The Water Cooling Expert
Dmitry: To help with this build I actually have a guest, so please introduce yourself.
Hans: Hello, I’m Hans Peder Sahl, and I am the Product Marketing Manager for the Corsair Hydro X Series.


Dmitry: Do you have any expectations for the build we are doing now?
Hans: The build that we’re going to be doing here is probably not going to be the most simple build we could have done, because we would like to see you doing hard tubing and really make an over-the-top system. It is going to take some time, it’s not going to take some learning, and this is probably not a beginner entry type build, but it is something that will end up looking like a true masterpiece.
Starting With The Cabling


Dmitry: Now before installing the graphics card, it is recommended to complete as much cable management as possible, which is what Hans helped me with. One trick we did here is to install the Commander Pro and the Lighting Node behind the plastic front panel so it is not in the second chamber and this helps to minimize cable clutter. Now doing cable management is one of my least favorite things when it comes to building a computer, even if it’s something basic, I just get stuck seeing all the cables and not knowing exactly how to route them. Luckily the Corsair 686X case has a second chamber, so all the cables get basically cluttered there and the main section with the system remains clean. Hans on the other hand loves cable management, he finds it therapeutic, and it’s all about patience and basically collecting all the cables and using zip ties to bunch them up in their own clusters.


Dmitry: We installed the reservoir/pump combo right behind the Commander Pro, it’s a great location for tube routing. Finally I mounted the graphics card. We intentionally wanted the vertical orientation to best showcase the block and to keep things stable. Hans 3D printed a platform that fills the space between the riser cable and the fans so the whole thing is completely stable.
Bending The Tubing


Dmitry: My first hardline tube is complete, thanks to Hans for all the valuable information that goes into making this possible. The actual process is fairly simple in terms of heating up a certain section that you need to bend, and making sure that you heat up the sides as well. You understand the complexity of making sure that the bend is properly complete and everything aligns to where you need to align. You don’t have much wiggle room and you quickly learn to really appreciate all the people who do water cooling and do really complex bends that go in and out of a system.


Dmitry: Now it’s time to show you how the bending is done and actually start to do our tubes for this sick build. The first thing we do is dip the silicon tube in water, this way it slides into the tube without resistance. Next we fire up the heat gun and concentrate the heat in the area where we want the bend to happen. You have to be careful not to be too close to the heat source as that will just melt the tube and form bubbles, but you also don’t want to be too far where the heat will just take forever to soften the tube. Once the center point starts to become softer, to a point where slight pressure bends the tube, we start to heat up a larger area in a side to side motion while still rotating the tube. We do this because the sides also need to be soft around the main bend, otherwise the tube might kink.


Dmitry: Now for our layout we are using many 90 degree bends, and one trick is to use a table with a corner in order to align that 90 degree bend perfectly. Hold it in place for a minute for the tube to cool down and harden. Then we can remove the silicon piece and observe the bend to make sure that we don’t have any bubbles or kinks. And to my surprise, I did not destroy a single tube throughout this entire process thanks to very good guidance from Hans.


Dmitry: Now the more challenging part was just around the corner, which is measuring where the bends need to happen and how long the tubes need to be. You realize just how much precision is necessary when it comes to hardline tubing, but you also realize that the majority of it is mainly eyeballing and learning from your mistakes. For example, Hans prepared a few tubes that were just a few millimeters too short, and that gave me a perfect blueprint to follow. That’s the general process too, you make a bend and see if it fits. It might be a little bit too short or the bend needs to happen a bit earlier or it went too far. You redo that and use the earlier pieces for guidance. For example, the 90 degree bend that I made for the top tube was one millimeter too short. Luckily we had some flexibility by moving the radiator to fit our tube alignment perfectly. This way nothing seems off angle, and the first tube follows vertical and horizontal lines perfectly. And finally it’s all about installing each line tube one at a time. My top tube had perfect RAM clearance and it was my first proper bend that came out very well.


Dmitry: With confidence I moved onto the second tube and here again the 90 degree bend was just two millimeters off, meaning we could start from scratch or heat up that section again and try to reposition where the bend happens. This is where Hans stepped in and we did it without destroying the tube. And then I was all on my own seeing where the bend needs to happen, cutting the tube, measuring again on the opposite end, cut again, and fit. And you just keep going until it’s like a perfect alignment. Once you’re 100% satisfied with it you move on to the next tube. Now the area behind the motherboard is normally done with soft tubing, but it was great practice before we get into the main section with GPU tubes as those are the most challenging.


Dmitry: For one, measuring something that you cannot see or is not easily accessible is very difficult. And that’s the case with GPU fittings because they’re facing towards the motherboard. Hans had this brilliant idea to recreate the same fitting layout at the front of the block and this allowed us to get the proper length measurement for that section of the tube from where it went into the bottom radiator. The most rewarding thing for me was finally inserting all the tubes, securing all the fittings, which were quite difficult to get to because of awkward spacing, and I have a new appreciation for all Mini-ITX custom loops because even reaching the fittings for the top radiator and the bottom radiator was a bit challenging in a regular-sized case.


Hans: I think for me the most frustrating things is to get the hard tubing runs the exact length because I’m very particular that nothing is out of angles. Therefore, if a hard tube run is one millimeter too long for example, then it will look crooked in my eyes and I will have to redo that entire run again. Taken care with it and just spending the extra time is just what it takes. Fore example, people will have to be comfortable with learning how to do a complicated run because you will mess up the first time, maybe also the second time. It is a learning curve and an experience to do.


Dmitry: The next thing was doing an air leak test, and that was a big surprise for me since it involved just blowing into the loop. If pressure is good you will feel no air leaking. This is that preliminary step to make sure that you don’t have like an open port somewhere. You do it with air first because if you blow into it and you have this massive resistance where the air just cannot travel anymore that’s a good sign. Whereas if air would just escape you know that you might have forgotten to put a plug somewhere or maybe one of the fittings is loose or something like that.
Filling The Loop


Dmitry: Now it’s time to fill the reservoir. We did it nice and slowly with a squeeze bottle with its own tube. This ensures that there’s no chance of spilling water on any of your components.


Dmitry: And finally, a very special moment in any water cooling project is when you start the pump and see all these bubbles and initial foamy water. It is actually very cool to witness the water path through the blocks. It took about two days for all the bubbles to disappear. After that if the built-in flow indicator wasn’t on the GPU block the flow would appear static.
Fully Assembled System


Dmitry: The moment you – and I – have all been waiting for: here’s the finished system.


Hans: I think that one of the most surprising thing was how quickly you actually picked up on bending the hard tubing. Because I’ve seen a lot of new beginners doing this stuff and like the norm is that you would take the first couple of meters and ruin those with like bad bends or measuring wrong. But we only used two and a half meters, and that’s pretty impressive for a first timer.


Dmitry: The fact that Hans was there throughout the entire process was a relief and he gave me the basics behind the tube bending, leak testing, and cable management. He also guided me through the initial setup with Corsair’s IQ software as all the fan RPM, lighting, and temperature monitoring is done there. We installed a few temperature sensors, one for the reservoir, one in the GPU inlet, one in the GPU outlet, and one ambient sensor for either case temperatures or external temperatures just so you can monitor what’s happening inside your loop.


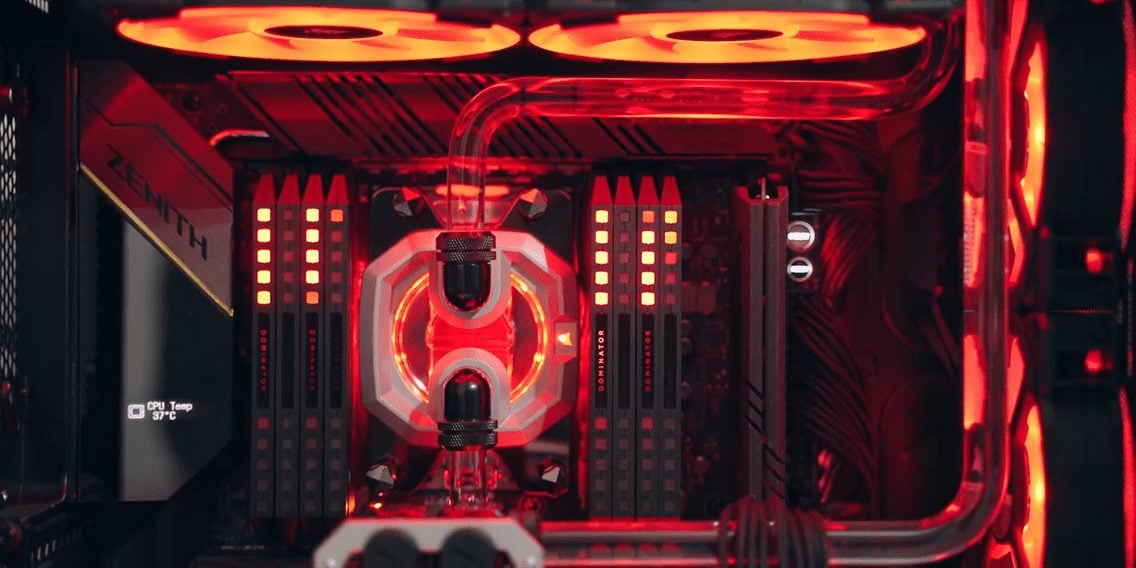

Dmitry: And let me tell you my friends, the temperatures are incredible. My ASUS RTX 2080 Ti STRIX is overclocked to almost 2100MHz with a slight overclock on VRAM too, and the maximum temperatures that we are seeing are in the low 50°C, which is just crazy. While the ThreadRipper 2950X idles around 37-38°C and spikes up to mid-60°C under load. All 16 cores have enough cooling capacity to reach 4.1GHz and beyond. That is the power of water cooling.


Dmitry: The last surprise was noise levels. My fans are currently set up to not even spin unless the water temperature in the reservoir hits above 34°C. In idle situations the fans are not spinning, so the system is completely silent. The fans do start to ramp up gradually as the water temperature rises so you don’t get those like massive spikes in fan RPM when there is a load on the CPU. Unfortunately, the pump is audible when the RPM goes above 2200, and it has a slightly higher pitched noise than I like and that is literally my only complaint with the system. My God I sound spoiled.


Hans: In regards to what I think one of the most challenging things was, it was quite evident that doing the whole cable management and like getting everything crammed in and zip-tied up probably took most of the time. Installing all the different components went pretty fast. Next to the tubing installation, and cutting, and measuring, the cable management and that stuff was definitely one of the most challenging things. If I were to do one at home in this same case then I would probably be copying this layout because it just works so well.


Dmitry: I still can’t believe that I’ve built it, and it’s so epic… yet it still does not run Red Dead Redemption 2. Since I haven’t ruined any tubing and Corsair sent me 9 meters of hardline tubing I’m thinking I should do another system. What do you all think? What should the next water-cooled system be? Let me know!